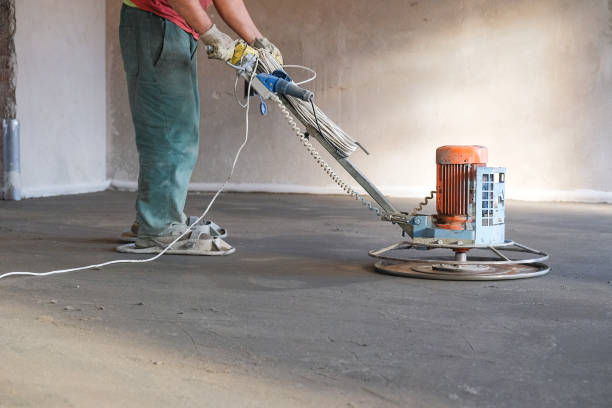
Concrete floor grinding uses a grinder machine to remove any old sealers or paints from a concrete floor and any adhesives or other materials that may stick to the surface. The grinding machine will use different types of abrasive discs to remove these materials from the floor.
After removing the old materials, you will need to clean the floor before you can apply any new sealer or paint. The grinding process create a lot of dust, so it is important to ensure the area is well-ventilated. Once the floor is clean and dry, you can apply the new sealer or paint.
Concrete floor grinding can be time-consuming, but it is worth it in the end. This grinding will give you a clean and smooth surface ready for any new finish.
Necessary precautions before concrete surface for grinding
A professional contractor will take the required precautions to ensure a safe and effective job. You should clean and remove any loose debris from the concrete before you paint it. The contractor will also need the proper equipment to grind the concrete surface.
To successfully polish a floor, you will need the right machine for the surface type and follow the right steps to prepare the surface.
STEP 1: Sweep and clean the floor thoroughly
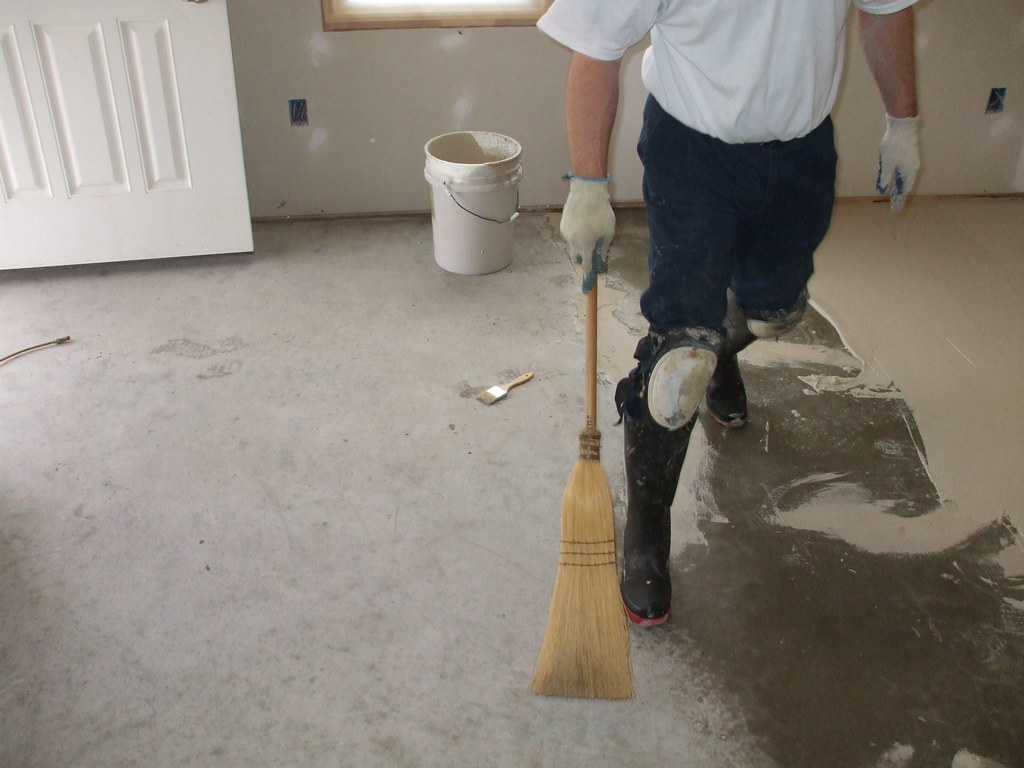
Use a stiff bristled brush to sweep the floor in one direction. Start at one side of the floor and work your way to the other. A back and forth motion with the brush loosens any dirt that may lead to the floor.
Next, use a hose or mop to wet the floor. You want the floor to be not soaking wet. Use a mild detergent to clean the floor once the floor becomes wet. You can either use a bucket and mop or a power washer. If you use a power washer, hold it at a 45-degree angle and use a low-pressure setting.
Once you have cleaned the floor, rinse it with clean water. Ensure that all the detergent has been removed by mopping the floor a few times. You should leave the floor alone to dry completely before walking on it or applying a sealer. After you dry the floor, you can use a sealer.
STEP 2: Inspect the floor for any cracks or chips

If you’re planning on concrete floor grinding, you’ll need to inspect the floor for any cracks or chips. You need to repair these before grinding, as they could cause problems with the grinding process.
The first step is to clean out the cracks or chips using a wire brush or other sharp object. Next, fill the gaps or chips with a concrete repair material like epoxy. You can begin grinding the floor after you set the repair material.
If you have large cracks or chips, you may need to use a concrete saw to remove them before you can begin grinding. Always wear safety gear when using a concrete saw, and follow the manufacturer’s instructions.
After you have repaired the cracks or chips in your concrete floors, you can begin concrete floor grinding. This process will smooth out the bottom and create a uniform surface. You will need to rent a concrete grinder from a tool rental company. Be sure to read the manufacturer’s instructions before using the grinder.
Always wear safety gear, such as a dust mask, when using a concrete grinder.
If you’re unsure how to repair cracks or chips in your concrete floor, you can always consult a professional for help. In addition, you can call a local handyman to come and repair the damage so that you can start your grinding project as soon as possible.
STEP 3: Attach the proper diamond grinding
Begin by attaching the proper diamond grinding head to your floor grinder. Depending on the condition of your concrete, you will need to choose a diamond grinding head with a different grit. A lower number signifies a coarser diamond that will remove more material, while a higher number signifies a finer diamond that will remove less material. Once you have attached the diamond grinding head, start the floor grinder and slowly guide it across the surface of your concrete.
Once you have attached the diamond grinding head to your floor grinder, start the floor grinder and slowly guide it across the surface of your concrete. As you navigate the floor grinder across the concrete, you must apply different amounts of pressure. For example, if you are removing a heavy coating, you will need to use more force. Conversely, if you eliminate light surface stains, you will need to apply less pressure. Experiment with different amounts of pressure until you find the perfect setting for your specific needs.
If you want to remove a heavy coating from your concrete, you will need to attach a diamond grinding head with a lower number to your floor grinder. It will remove more material from the surface of your concrete. On the other hand, if you want to remove light surface stains, you will need to attach a diamond grinding head with a lower number to your floor grinder. It will remove less material from the surface of your concrete.
Once you have finished grinding the concrete, vacuum up the debris and enjoy your newly smooth surface.
STEP 4: Pour a bucket of water on the floor
The best way to do so is by pouring a bucket of water on the floor before it. It will help to loosen any dirt or debris stuck to the blades, making it easier for you to clean them effectively.
Be sure to do this before grinding, as you don’t want to risk getting water on your grinding surface and causing it to become slippery. Once you finish, make sure to dry the area thoroughly to prevent any accidents.
Overall, cleaning your floor grinder with water is a quick and easy way to keep it in good condition. Plus, it can help prolong your grinder’s life by keeping the blades clean and sharp. So, if you’re looking for an easy way to keep your sub clean, try this method.
STEP 5: Grinding the floor in a back and forth motion
When grinding the floor, always move in a back and forth motion. It will ensure you evenly rub the floor and don’t miss any spots.
Start by moving the grinder in a large square pattern. Then, once you’ve gone over the entire floor, go back and make smaller passes over the floor, focusing on any areas that you may have missed the first time.
Keep the grinder moving at all times, and wear ear and eye protection to avoid accidents.
STEP 6: Sweep up the concrete dust
After all the hard work of grinding your concrete floor, the last thing you want to do is leave a big mess behind. Luckily, cleaning up your newly ground floor with just a few simple steps is easy.
First, sweep up any concrete dust that you left behind. A broom and dustpan will do the trick, or you can vacuum it up if you prefer.
Once you clean the dust, enjoy your newly ground concrete floor! It should look smooth and shiny and will be much easier to keep clean from now on.
Thanks for all your hard work, and enjoy your new floor!
If you’re unsure how to use concrete floor grinder, plenty of online tutorials and resources can help. And, if you need extra help, you can always hire a professional to do the job for you.
Most Common Type of Concrete Floor Grinder
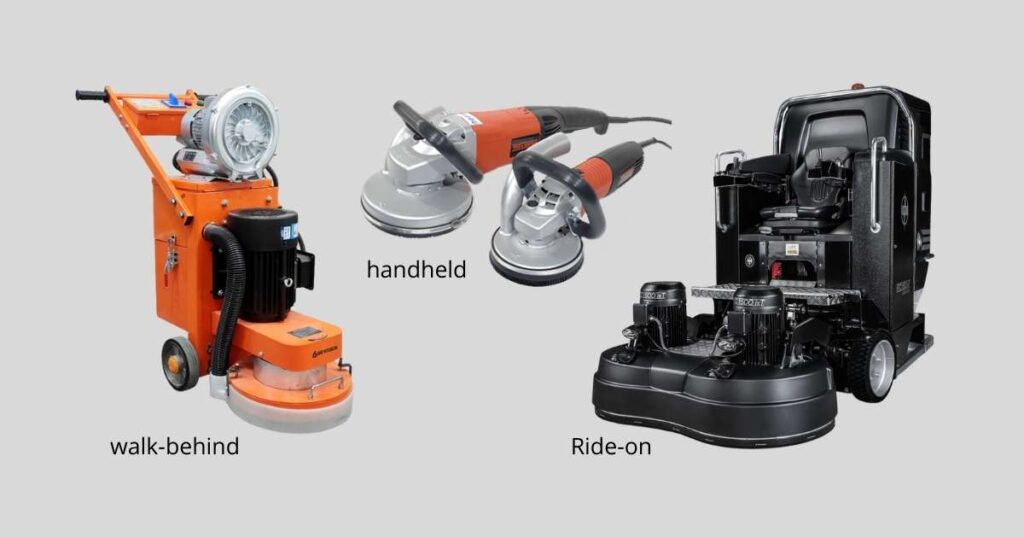
There’re a few different types of concrete floor grinders available on the market. Here are the most common:
1. Handheld Concrete Floor Grinders: These are the smallest and most portable concrete floor grinders. They are ideal for small jobs, tight spaces, and edges.
2. Walk-Behind Concrete Floor Grinders: These are larger and more powerful than hand-held grinders. They are ideal for larger jobs, open spaces, and tough concrete.
3. Ride-On Concrete Floor Grinders: These are the largest and most powerful concrete floor grinders. They are ideal for industrial jobs, large spaces, and thick concrete.
Handheld Concrete Floor Grinders
A hand-held grinder is a perfect tool for grinding and polishing concrete floors. You can remove old sealers, paint, and other coatings and grind down any rough spots in the concrete with the right attachments on a hand-held grinder. You can also use a hand-held grinder to polish the concrete to a high shine. A hand-held grinder is a great option if you’re looking for a versatile tool for concrete floors.
Remember a few things when using a hand-held grinder on concrete floors:
- Always use the correct type of grinding wheel or attachment.
- Make sure the concrete is dry before you start grinding.
- Start with coarse grit and gradually move to a finer grit.
- Always use safety goggles and a dust mask to protect yourself from concrete dust.
With the right attachments, a hand-held grinder can be a versatile tool for grinding and polishing concrete floors.
Attachments for a hand-held grinder include:
- Abrasive grinding wheels: These are the most common type of wheel used for grinding down rough spots in the concrete.
- Diamond grinding wheels: These wheels are used for grinding down the concrete with high hardness.
- Polishing pads: These pads are used for polishing the concrete to a high shine.
- Sanding discs: These discs are used for sanding down the concrete to remove old sealers, paint, or other coatings.
Always use the correct type of attachment and make sure the concrete is dry before starting to grind. Start with coarse grit and gradually move to a finer grit. Use safety goggles and a dust mask to protect yourself from concrete dust.
Walk-Behind Concrete Floor Grinders
If you’re looking for the best possible finish on your concrete floors, you’ll need to invest in a good-quality concrete floor grinder. There are many different types and brands of floor grinders on the market, but walk-behind concrete floor grinders are the best option for most people. They’re easy to operate and can cover a large area quickly.
There are two main walk-behind concrete floor grinders: those with a disc and those with a drum. The disc type is the most common; engineers use it for rough grinding and finishing. The drum type is better for coarse grinding and will remove more material.
Walk-behind concrete floor grinders are available in various sizes and power levels to suit your needs. Of course, the grinder size will depend on the area you need to grind. Likewise, the power level will depend on the type of work you’re doing. For example, a lower power level will suffice if you do light surface grinding. But you’ll need a higher power level if you’re doing heavy-duty grinding.
You can easily get the job done quickly, no matter what type of walk-behind concrete floor grinder you choose. It’s a great investment for anyone who needs to do a lot of concrete grinding.
Ride-On Concrete Floor Grinders
Ride-on concrete floor grinders are a type of floor finishing equipment used to grind and level concrete floors. Professional contractors typically use these grinders to prepare concrete floors for new finishes or to remove old ones. Ride-on concrete floor grinders are available in various sizes and styles to accommodate different flooring projects.
Ride-on concrete floor grinders typically have a large grinding head powered by an electric motor. The grinding head mounts on a platform designed to follow the contours of the floor as it moves. The operator controls the grinder’s direction and speed by steering the platform.
Ride-on concrete floor grinders are an efficient way to grind and level concrete floors. You can achieve a variety of finishes with them because they are easy to operate. If you are considering using a ride-on concrete floor grinder for your next project, be sure to check out the available models and sizes to find the one that best suits your needs.
Grind in small areas at a time
If you’re trying to remove paint or clean up a small area of concrete, you can do so by grinding it down. You should grind the meat in small sections to avoid overloading the grinder and causing it to overheat. Be sure to wear safety goggles and a dust mask while working, and keep the area well ventilated.
Start by putting on your safety gear. Then, begin grinding the concrete in small sections, working your way back and forth until the entire area is covered. Be sure to keep the grinder moving so that it doesn’t overheat.
After you finish, vacuum up the debris and dispose of it properly. You may need to repeat the process if the paint or concrete is particularly thick.
Avoid overheating the floor
To avoid overheating, grind the concrete in small sections at a time. Make sure to keep the grinder moving, so it doesn’t stay in one spot for too long. And, if possible, use a lower speed setting on the sub.
If you overheat the concrete, stop grinding and let the area cool before continuing.
How much does it cost to grind the concrete floor?
The cost of grinding a concrete floor depends on several factors, including the floor’s size, the floor level, and the type of floor. For example, you can grind a small floor for as little as $3, while a large floor can cost up to $12. The floor level also affects the cost of grinding, with a more difficult floor requiring more time and effort to grind. Finally, the type of floor also affects the price, with a more durable floor requiring less grinding and a less stable floor requiring more grinding.
Generally, the cost of grinding a concrete floor is between $3 and $12 per square foot.
Factors that will affect your cost:
- The size of your floor
- The level of your floor
- The type of floor
Concrete Floor Grinding Pros & Cons
Pros
Concrete floor grinding has many benefits for residential and commercial applications. When done by a professional, concrete floor grinding can:
- Remove old coatings, paints, adhesives, and residues
- Prepare the surface for new finishes or treatments
- Create a smooth, level surface
- Help to improve the overall appearance of the floor
- Increase the durability of the floor
Concrete floor grinding is a versatile and cost-effective way to achieve the desired results for your flooring project. Contact a professional flooring contractor for specific needs and get a free estimate.
Cons
There are a few potential drawbacks to concrete floor grinding as well, including:
- The potential for creating dust and airborne particles
- The need for specialized equipment
- The possibility of damaging the floor if not done properly
Conclusion
When grinding a concrete floor, it is important to take precautions to ensure your safety and the quality of the job:
- Wear the proper safety gear, such as goggles and a dust mask, to avoid inhaling any harmful particles.
- Ventilate the side to allow for the proper dispersal of any fumes. In addition, it is important to use the right type of grinder for the job, as using the wrong one can damage the floor or create a hazardous situation.
- Once you complete the job, thoroughly clean the area to remove any harmful dust or debris.


